
This command duplicates a selected polyline and transforms it into a camera path. You can then create virtual visits in the 3D scene with specific targets and control the animation duration. Once the animation is set, you can export the result into a video compressed or not (according to which codecs are installed on your computer).
Select an existing polyline and launch the command.
Edit a camera path or create a video using an existing camera path using the command again the command, the Contextual menu, or by double-click on the element.
|
|
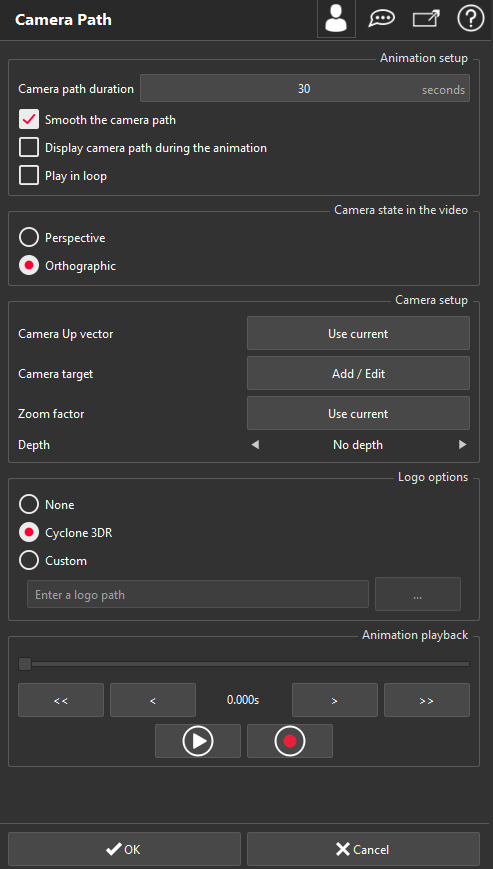
Animation setup: this frame allows you to set up different parameters during the video playback. By default, a virtual visit lasts for 30 seconds but this duration can be adjusted by modifying the value in the Camera path duration text entry. If the duration is longer than 5 minutes, a warning message appears to let you know that generating the video may take some time behind this value. Then, a smoothing is applied by default to the selected polyline that tends to produce pleasant-looking animations. You can enable this feature by checking the box called Smooth the camera path. The two other options concern the playback options:
Display camera path during the animation: if checked, the polyline used to generate the camera path will be visible during the animation or the video generation.
Play in loop: if checked, the animation will be played in loop if the polyline is closed or back and forth if not.
Note
This last option does not affect the video generation.
Camera state in the video: choose to create the video in perspective or orthographic mode. If you want to simulate a movement inside the 3D scene, select Perspective. Otherwise, select Orthographic (for instance, to turn around the object).
Camera setup:
With the Camera Up vector button of this frame, the up vector of the camera can be specified. Once the camera is correctly oriented, you just have to click on the button Use Current to redefine the camera up vector.
The button Add / Edit can be used to add, modify or suppress targets. During the animation, you can specify a point to target. To do this you have to:
Move the slider where you want to add a target.
Click on the Add / Edit button.
Click on the point you want to target or press ENTER to reuse the last target.
Note
By default, the camera orientation is guided by the path tangents.
You can click onto the polyline if you want to orient the camera along the path.
If only one target is set, the camera will stay focused on the clicked point.
To modify an existing target, you just have to move the slider on the frame where the target is defined and click on Add / Edit. If you click on a point, the target will be updated. However, if you press Backspace, the target will be removed.
The button Zoom factor, Use current is available only when the camera is in ortho. It fixes the zoom factor of camera for the whole animation.
The Depth parameter allows you to define a slice thickness (like limitplane) so that everything behind this distance is hidden.
Animation playback: in order to ease the selection of a frame, several buttons have been integrated to the interface:
The slider offers the possibility to navigate quickly in the animation.
The buttons labeled by < and > move respectively the slider one second backward or one second forward.
Moreover, the buttons << and >> jump directly to the previous or next target (if exist).
The current time in the animation is then displayed in the text box just below the slider.
The animation can be played by pressing  or recorded by pressing
  . When the record button is pressed, a dialog box appears to enter the filename and then to choose the codec to use.
Advanced Parameters
An option is available to customize the videos. It is possible to choose a logo. It will be visible from the bottom left of the screen during the registration.
It is possible to:
Not display any logo
Display Cyclone 3DR logo
Display a custom logo
|
Keyboard shortcuts
Several shortcuts have been designed to ease the navigation in the animation. When the slider is focused, you can press:
Left/Right arrow to move one frame backward/forward.
PageUp/PageDown to move one second backward/forward.
Home/End to move to the beginning/end of the animation.
If the 3D scene is focused, you can press the space bar to enter into the freefly camera mode. Press the space bar again to return into the camera view.