Tree view
Generality
The tree view allows to visualize and interact with all the elements of the project (point clouds, meshes, polylines...).
It is divided in two areas: a toolbar and a list view.
The toolbar
The toolbar contains two filters (by object name and by object type) and a button displaying a menu to adjust tree view settings.
|
Filter by object name:
|
|
|
|
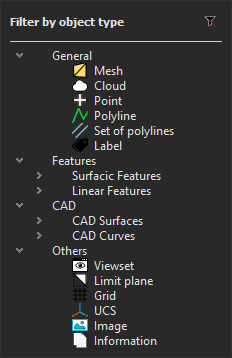
Filter by object type: |
|
Both filters are compatible with each other. |
|
Display options: |
|
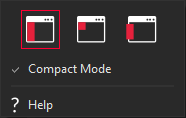
Position The tree view is available in 3 different modes: Docked, Integrated, Floating
Tip & Trick Use the Floating mode to display the tree view on a separate screen. Compact Mode
This mode is enabled by default. |

The list view
This view is composed of 3 columns.
The first column displays the name of the object.
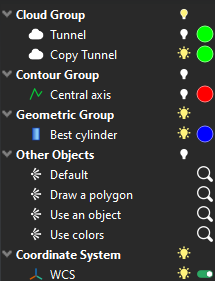
The second column is used to display the visibility status presented as a small bulb icon:
|
Icon |
Description |
|
|
The element is visible. The same icon is used for a folder when all children elements of this folder are visible. |
|
|
The element is hidden. The same icon is used for a folder when all children elements of this folder are hidden. |
|
|
The folder contains both visible and hidden objects. |


To show only an element from the tree, press CTRL and click on the bulb icon. If the object is outside the scene, the camera moves to make the object entirely visible.
To show or hide objects in the 3D scene, you just have to select them (in the scene or in the tree), then right click and select:
Hide to remove the selection from the 3D scene
Show to display the selection in the 3D scene
Show only to make everything invisible and then show the selection
Zoom on to make a progressive zoom in order to see where the object is located
The third column allows users to interact with the object.
Most of the time, there is a colored disk displaying the component color. Clicking on it will allow you to change the element aspect.
Tip & Trick for clipping planes and UCS
For clipping planes and coordinate systems, the disk is replaced by a red/green switch used to quickly activate/deactivate the object.
Default folders
New projects are created with the following default folders:
|
Folder |
Description |
|
Cloud group |
Default folder for clouds |
|
Mesh group |
Default folder for meshes |
|
Contour group |
Default folder for polylines |
|
Geometric group |
Default folder for geometries: planes, cylinders, circles... |
|
Measure group |
Default folder for inspected elements and labels |
|
CAD group |
Default folder for CAD objects |
|
Other Objects |
Default folder for view sets, camera paths, trajectories or grids |
|
Clipping Group |
Default folder for clipping planes |
|
Coordinate System |
Default folder for coordinate systems |
|
Cloudworx group |
Default folder for cloudworx clouds |
These default folders cannot be deleted. They are hidden if there is no element (for instance deleted or moved).
Interactions
Rename items
3 options are available in order to rename an object:
Slowly double-click on the object in the tree view.
Select the element and right-click to use the contextual menu.
Select the element and press the F2 key.
Tip & Trick
Rename several elements in one click by selecting all of them and then hitting the F2 key (or through the contextual menu). The name will be the prefix followed by an incremented number.
For example, using "tunnel" as a prefix will create "tunnel 1", "tunnel 2", "tunnel 3"...
Drag and drop
Items can be dragged and dropped in the tree view from one folder to another in order to reorganize your data.
Keyboard shortcuts
The tree view uses most of the shortcuts available on Windows Explorer. Read also Shortcut keys.
|
Key |
Behavior |
|
F2 |
Rename the selected element(s). |
|
F3 |
Set the focus on the filter field. |
|
+ |
On a selected folder, unfold the folder. |
|
- |
On a selected folder, fold the folder. |
|
* |
On a selected folder, unfold all the sub-folders. |
|
SHIFT |
Select element(s) contiguously. |
|
CTRL |
Toggle selection of element(s). |
|
CTRL + Left Button |
On the bulb icon, show only the selected element(s). |
Tip & Trick: property
Hover the mouse on an element's name to display its properties.
Tip & Trick for invisible objects
Keep pressed the left button on an invisible object in tree view in order to display it temporary in the 3D scene.
This works for all objects except view sets and local coordinate systems.
For clouds and meshes, if the number of points/vertices exceeds the number of points for dynamic display, the object will not be previewed.