Calibrate Camera

images/download/attachments/113546634/CmdCalibrateCamera.svg

This command consists in using chessboard images to calibrate the camera. Calibrating camera means to compute internal parameters of the camera. These parameters describe geometric elements of the camera and can then be used to texture automatically a photo taken from the same camera:

  • physical Size of sensor, in millimeters

  • size of a pixel on sensor in millimeters

  • focal length in millimeters

  • PPS: Principal Point of Symmetry, center of radial distortions. This point is relative to the center of sensor

  • radial distortions. Distortions represent geometric defects

The computation needs at least 3 pictures of a chessboard. On each image, the chessboard must be completely visible. All the images have to be taken by the same camera using the same focal length.

No selection required to launch the command.

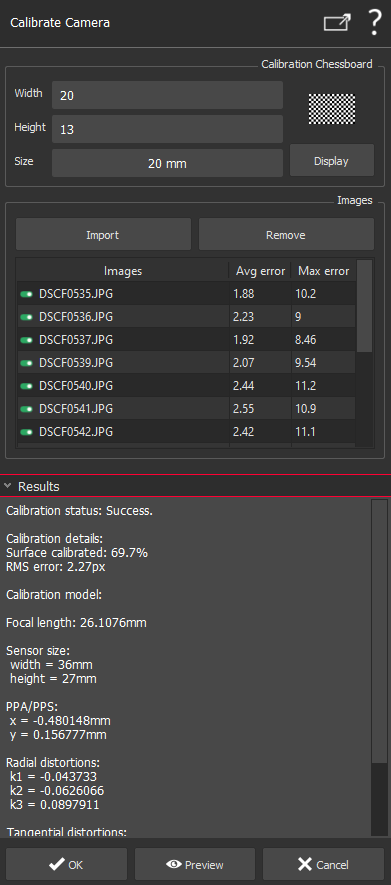
images/download/attachments/113546634/CalibrateCamera_En.png

In order to calibrate your camera:

  1. Set the different chessboard parameters (number of rows, lines and size of a square)

  2. Import the images

    You can click on the button Display fullscreen chessboard (or press F11) to show the calibration chessboard in fullscreen according to the given parameters. This way, you do not have to print a calibration pattern on a piece of paper but you can directly take pictures of your screen.

  3. Hit Preview

You can activate/deactivate an image by using the icone next to the image name.

Textual results

    • Percentage of sensor surface where chessboard corners were found

    • Root mean square (RMS) error

    • Internal parameters

    Saving the calibration results: the OK button is available when a calibration is done, but not available if an image is added or a point deleted: a new calibration has to be done by clicking on the Preview button to activate the OK button.
    When you push the OK button, the file is saved in the same folder as the images:

    • INCAM file: one for the project with all internal parameters. The .incam file is the most important because it can be used in all other projects with the same camera and focal length (to texture a mesh, for example); see Estimate Pose.

    • The INCAM file must be located in the same folder of the related image(s), so that the image(s) will be set to perspective type with the defined internal parameters from the INCAM. If there is no side file, the image type will be unknown unless it is an ortho-image with embedded world file.