Exercise: Fill holes with curvature filling
Open the file FillHoles.3dr and run Elevation View twice.
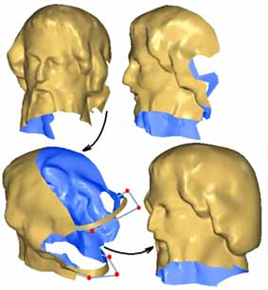
It represents the face of a statue, but the back of the head could not be measured, as well as a part of the nose. This file contains one mesh for each step of this exercise and the goal is to recreate the complete head. For the back of the head we cannot directly use the command Fill Holes because the hole is too large and the neck part should not be filled at all.
 In the case of the file FillHoles.3dr, it is necessary to preserve continuity with the surface of the border to recreate the back of the head
The first step is to start from the object 1-StartingMesh and to create bridges like on the picture above. The result you should obtain is something like 2-ReadyToFill; you can click on this object in the object explorer to have an idea of the expected result.
Create a bridge between free borders
Launch the command Bridge. We will create two bridges: one that is used to delimit the back of the neck, and a second one that will be used to guide the subsequent hole filling process by its round smooth shape imitating the back of the head.
Do the following steps:
Click the two free edges as shown on the figure above. The default bridge you obtain does not have the appropriate shape (too sharp and the medium orientation is not vertical),
Drag the red balls to change the length of the first and last segment as well as the middle ball to obtain something more rounded,
You can also move the Tension slider to automatically adjust the control points of the bridge,
You can adjust the Orientation,
When you are satisfied with this first bridge, select Sew and click OK, Next to start your second bridge,
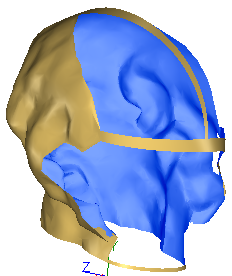
Click the two free edges as shown on the above figure. The default bridge you obtain looks too much like a circle,
Press CTRL to select the 3 red balls together,
Move the 3 balls together to get something like 2-ReadyToFill, and
Click OK, Exit.
Note
You can also create a junction attached on another junction like you can see on the next picture.
 Example of bridges
Fill Holes
Now we can fill all the holes with the command Fill Holes. Select the object you have obtained previously or simply select the object 2-ReadyToFill and launch the command.
Click all the holes except the neck hole,
Activate options Add points inside holes and Curvature filling. Adjust curvature filling slider to increase or decrease the volume of the head,
Press the Preview button. You should obtain something like the object 3-AfterFill,
Click the button OK, Next,
Click the neck hole in order to select it,
Unselect the option Curvature filling,
Press the Preview button. You should obtain something like the object 4-ClosedMesh,
Click OK, Exit to validate the command,
Now, if you want something perfect, you can use the command Global Smoothing and you will obtain a shape like 4-ClosedMesh.