Exercise: Texture a mesh with reference points
Open the file “TextureRefPoint.3dr”, then import the following perspective images “TextureRefPoint.jpg” and “TextureRefPoint-Distortion.jpg”.
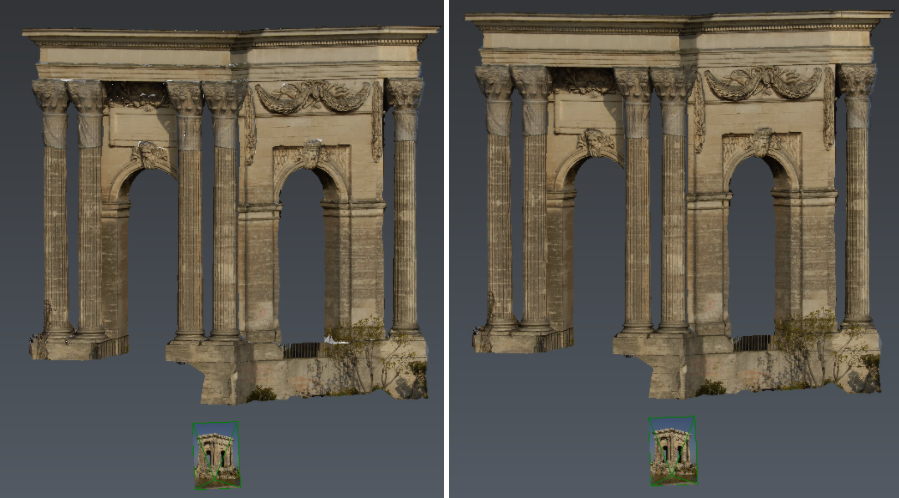
 The monument to texture with reference points
Click reference points
Classic picture
Select the image "TextureRefPoint" and go to Estimate Pose. The view will be automatically divided into two parts:
On the left, the texture to map;
On the right, the mesh to texture.
Click now on a point on the mesh and then the corresponding point on the picture (or vice versa). You can click angles or details in order to be more accurate. The points should also be scattered all over the model. All the couples should be sufficiently distant in order to map correctly the texture. Click the Remove button in order to remove a pair or deactivate it when it is doubtful. Once you have entered four couples of points, you can see the position of the camera in the 3D View.
Type of image
Make sure that the type of the image in the options is defined here in perspective mode.
If you have some difficulties to enter the points, you can empty your list of points and then press the Import button and select the file "TextureRefPoint.txt". You will have a sample with 7 couples of points. Note that in most of cases, 4-5 couples are sufficient. But if you have a distorted picture (for example taken with a “fish-eye” lens), you will have to enter more points (probably 10 couples).
At any time, when you think that your reference point definition is correct, click the OK button to validate.
Reference list of points
Save your list of pairs before validating the command if you want to edit it afterwards.
Then select the mesh and the image "TextureRefPoint" in order to launch Standard Texture.
You also can texture a model with Smart Texture: refer to Exercise: Texture a mesh with spherical images.
In addition to the camera position, the software needs to know which triangles have to be textured according to its visibility from the point of view. The problem is that the definition of “visible” is not always clear because:
Some triangles can be partially hidden by other surfaces.
Sometimes the model is not correctly measured and you get some hidden triangles because of noisy parts.
In this example, select the option Fully visible triangles and then click Preview. If you turn the 3D view a little bit, you will see some non-textured triangles because at least one of the three vertices is not visible from the camera point of view. Then select the option Invisible parts and click Preview again. All triangles will be textured.
 On the left, only visible triangles are textured; on the right all triangles are textured, but it creates blurring zones.
Once the result of your preview is correct, you can validate with the OK button.
Picture with distortion
If you want to practice more, you can redo the exercise with the picture “TextureRefPoint-Distortion.jpg”. You will have to enter more couples of points in order to compute the lens distortion. You will have to click points all over the picture, including on the corners. You can import the file “TextureRefPoint-Distortion.txt” in order to have a sample.
Create an ortho-image
Once the mesh is textured, you can for example create an ortho-image.
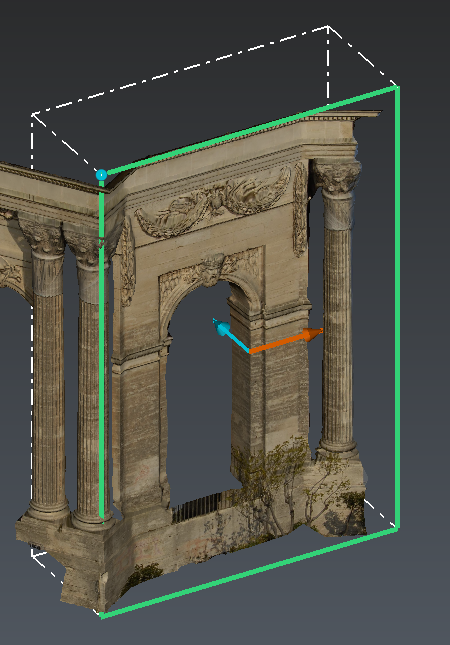
Launch Extract OrthoImage and choose Elevation view mode.
Click 2 points on the right wall, then set the Depth with the 3rd one. Adjust the limit box through the 3D scene (CTRL+SPACE) or through the dialog:
Width: 10 m
Height: 15 m
Depth: 4 m
Origin: 1035.75 5024 120.75
 Export an ortho-image
Set the Pixel size to 0.01 m and the Background color to white.
Finally, Save the image. The created image has a resolution of 1000x1500 pixels.
A .txt or a .tfw or a .jgw file (at the same place than the picture and with the same name) is created to save georeferencing information (position of corners, pixel size, the view direction, etc.) so that the image can be easily imported in another software.