Edit Colors
![]()
This command allows to modify the color, the scale and the threshold values of an inspection mapping.
Note
This command is used in several situations:
To modify color map coming from the comparison of two objects,
When an object contains a value associated to each point. For example if you load a cloud from Leica pts format including intensity.
When a cloud is colored along a direction or according to its density or timestamp.
When we display curvatures on a mesh.
Etc.
Select one (or several) object(s) with a gradient and launch the command (can be a cloud, a mesh, a polyline, etc.). You also can double click on an object or launch this command through the treeview (if its current representation mode is inspection when several editions are compatible).
When several objects are edited, the modification will be applied to all objects.
If all the objects have the same gradient definition (same number of thresholds, with the same values and colors...), this one will be proposed at first. Otherwise, a default one will be proposed.
Choose a preset with the Presets button, 5 are available by default:
Regular Steps
The gradient is equally divided. You can select how many steps you want at start and edit them one by one later.
Regular Centered
You can select the origin of the first step and the step size. You can edit the steps one by one later.
List of Values
You can directly set the exact steps you want.
Tolerance
The gradient is split in 3, you can choose the minimum and maximum tolerance of the middle range.
Over/Under
The gradient is split in 2 thanks to the given origin.
You can Save custom presets. This will create a RSI file on your computer. Later, you can Load custom presets by loading RSI files. Restore will reset minimum and maximum values.
Every step (or interval) is editable if you click on it:
Click Synchronize color to set a single color per range or a gradient of colors.
Edit the upper color by clicking on the top colored square.
Edit the lower color by clicking on the bottom colored square.
Change thresholds using the arrows.
Delete the interval with the bin icon.
Interpolation: choose the coloring method (refer to the note below).
Check Show Gradient to display the color gradient next to the 3D scene. It will remain active even if you close the dialog box and as long as the object is displayed with its color map. In this palette you can see additional information:
Graduations to know which value corresponds to which color.
The unit corresponding to deviations. You can set a unit different from the document unit.
The distribution of the points, represented as a curve.
The percentage of points between two graduations.
Check Show distribution information to display the distribution diagram next to the scene gradient.
Set the Unit of deviation values.
If you are editing inspected multilines:
Check Show Deviations to display the hair diagram.
Enlarge the hair diagram with the slider Magnify.
Check Show Quotations to display quotation texts in the 3D scene.
Check Highlight Extreme Values to add a frame around the minimum and maximum values.
Reduce or increase the number of decimals with the slider.
If you are editing inspected clouds:
Check Show quotations to display the quotations texts.
Check Highlight extreme values to add a frame around the minimum and maximum values (or change the frame background color).
Reduce or increase the number of decimals with the slider.
Set a custom Font color or use the gradient color.
Set a custom frame Background color or let it fully transparent.
Adjust the frame Background opacity.
Check Show values outside the gradient range to display all the values even if they are outside the gradient range defined at point 3.
Click OK to validate the new colors or Cancel to exit and keep the previous ones.
Coloring method
When the colors on both sides of an interval are different, you can choose between several automatic gradients with the parameter Coloring method:
Linear: to create a gradient with 2 blended colors.
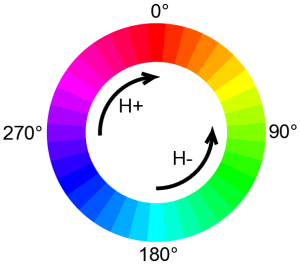
HSL (Hue Saturation Lightness): in that case, you have to define a gradient direction on the wheel below. Hue increases clockwisely (CW) and decreases counterclockwisely (CCW). There is also a Shortest (minimum ΔH) or a Longest (maximum ΔH) way on the wheel.