Exercise: Create a stockpile project
Open the file
Open the file “Stockpile.3dr”. It contains a cloud with several gravel stockpiles. This file is going to be used through this whole exercise. Select Stockpile cloud and launch the command Stockpile.
Tip & Trick
To help you draw or select the contours, polylines have been added to this sample.
Create stockpiles
Stockpiles n°1, 2 and 3
Click on New Stockpile and define main characteristics of stockpile n°1:
material name: 10001 (for instance a material ID),
material nature: gravel
grain-size: 4/6.
Note that you are free to modify or to add your own fields. You can also modify the stockpile color by clicking on the colored square. Click OK. If necessary, you will be allowed to modify later all stockpile definition items thanks to shortcuts within the command.
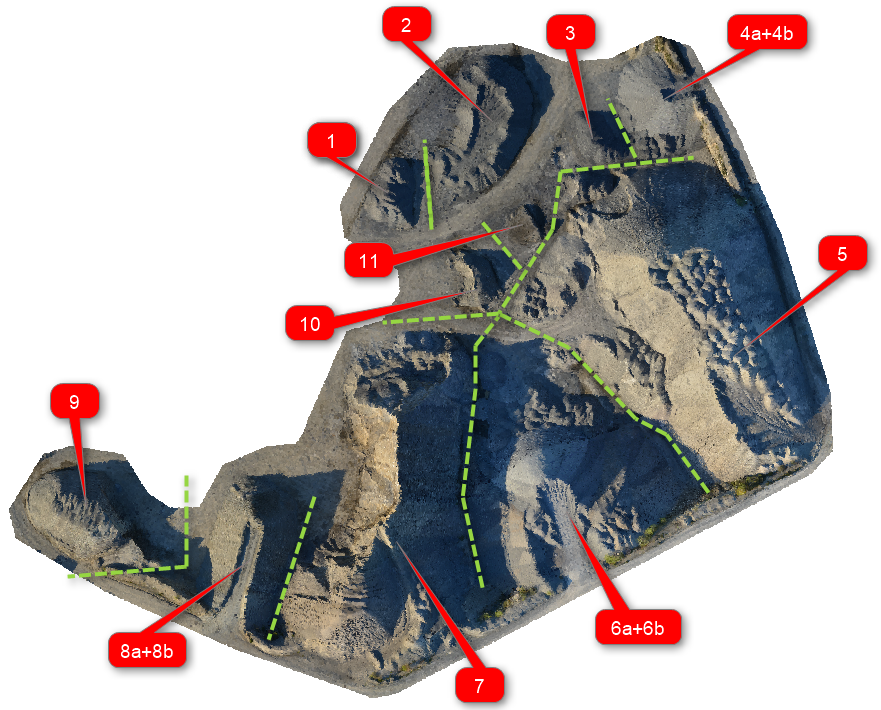
Then, you can draw manually or select its contour (refer to the stockpile map, to the polyline Contour 1 and to fig.1). Close and validate the contour with ENTER.
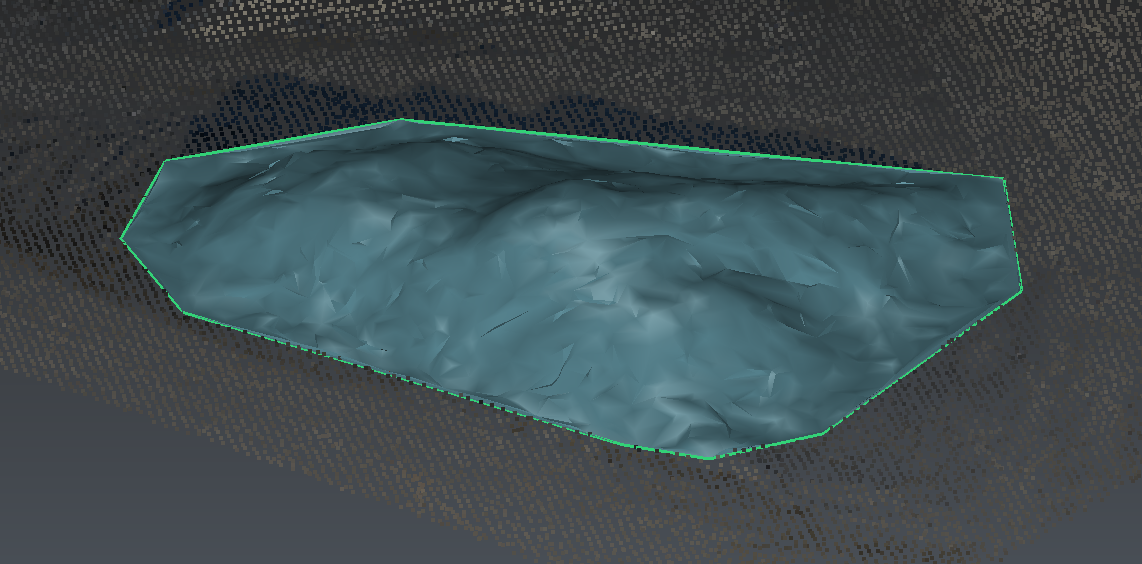 Figure 1: stockpile n°1
Select the Best plane from contour method to mesh the initial ground below the stockpile. Click Preview. You can use the bulbs to display/hide elements (this can help to find out the best computation method for the ground). Here, you don't have to apply a spike elimination. Click Reset to start again the stockpile contour, if necessary.
Click OK, Next and repeat the same workflow for stockpiles n°2 and 3, using the parameters in the chart below.
|
Stockpile name |
Material name |
Material nature |
Grain-size |
Method |
Spike elimination |
Cut Volume |
|
1 |
10001 |
gravel |
4/6 |
Best plane from contour |
None |
422m3 |
|
2 |
10001 |
gravel |
4/6 |
Best plane from contour |
None |
2365m3 |
|
3 |
10002 |
gravel |
4/6 |
From contour points |
None |
294m3 |
Note
Some stockpiles are along embankments. Consequently, you have to find out the initial ground. Sometimes, you can reconstruct the embankment shape by splitting the stockpile (n°4, 6, 8). Sometimes you can't (n°5 and 7) but you have to choose the less inaccurate method.
Stockpile n°4
For this stockpile 4, you have to proceed in 2 steps by computing first the main part 4a above the ground, and then create another stockpile 4b corresponding to the part above the embankment. In both cases you should start drawing the contour by clicking points corresponding to the border between parts, that is to say points corresponding to the low and invisible embankment edge. Choose the From contour points method to compute the 2 parts. Note the gap size between both parts depends on the cloud resolution.
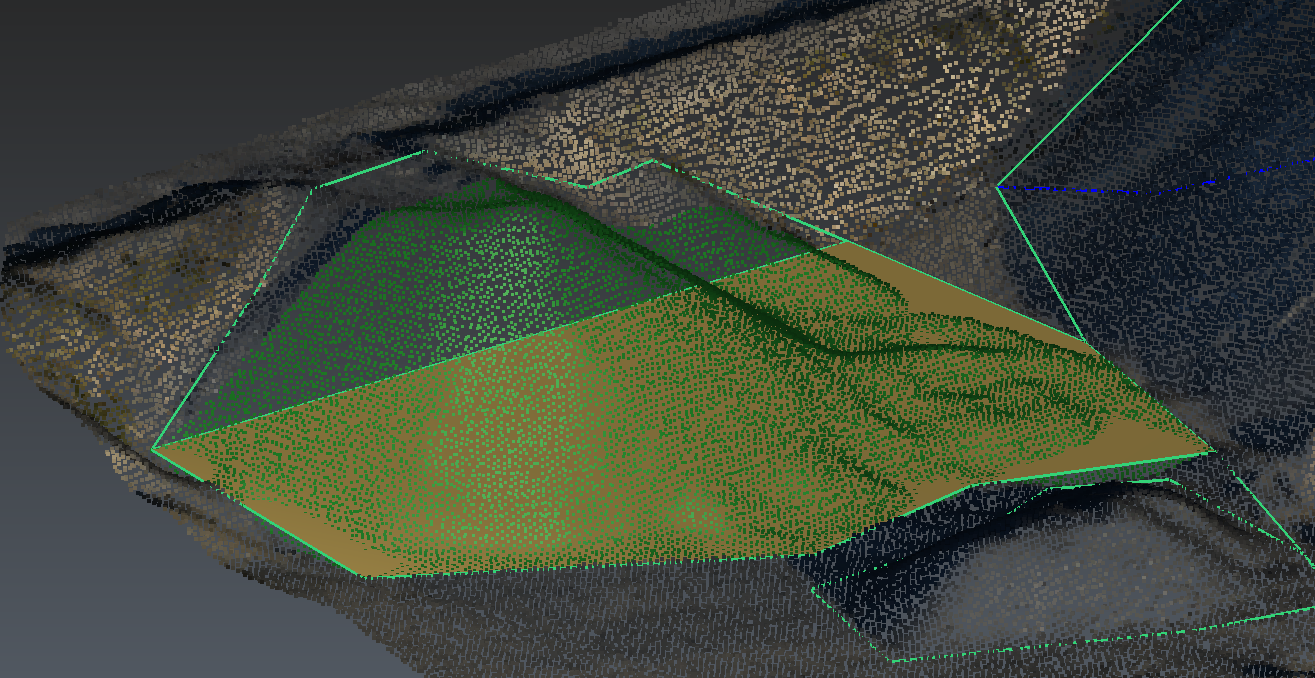
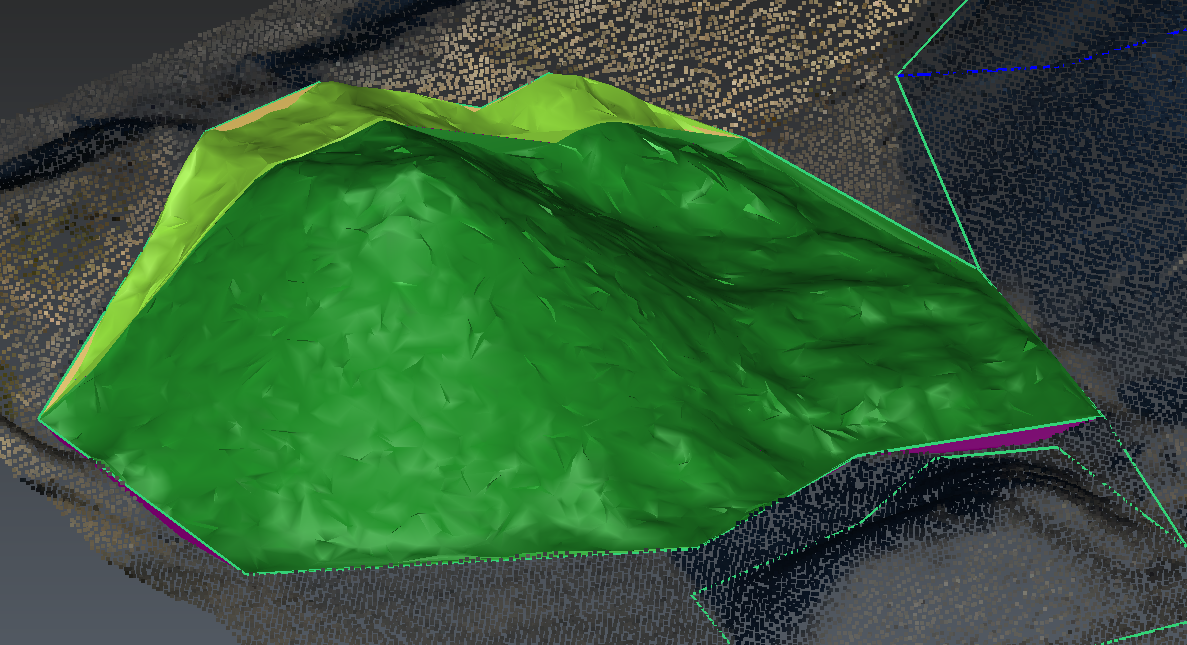 Figure 2: stockpile n°4 (a+b)
|
Stockpile name |
Material name |
Material nature |
Grain-size |
Method |
Spike elimination |
Cut Volume |
|
4a |
10003 |
gravel |
4/10 |
From contour points |
None |
1874m3 |
|
4b |
10003 |
gravel |
4/10 |
From contour points |
None |
187m3 |
Tip & Trick
In fact, you can proceed in the same way for stockpile n°5 and 7. However, you have to reconstruct the low embankment edge before. For this exercise, show both help lines.
Other stockpiles
Repeat the same workflow for each stockpile. You can also go directly to the next section.
|
Stockpile name |
Material name |
Material nature |
Grain-size |
Method |
Spike elimination |
Cut Volume |
|
5 |
20001 |
stone |
100/200 |
Horizontal plane from lowest point |
Medium |
91363m3 |
|
6a |
20002 |
stone |
0/150 |
Horizontal plane from lowest point |
Medium |
22821.5m3 * |
|
6b |
20002 |
stone |
0/150 |
From contour points |
Strong |
1390m3 * |
|
7 |
20003 |
stone |
0/80 |
Horizontal plane from lowest point |
Medium |
50292m3 |
|
8a |
10004 |
gravel |
0/31.5 |
Horizontal plane from lowest point |
Medium |
5773m3 |
|
8b |
10004 |
gravel |
0/31.5 |
From contour points |
Medium |
318m3 |
|
9 |
10005 |
gravel |
4/10 |
Horizontal plane from lowest point |
None |
5082m3 |
|
10 |
00001 |
sand |
0/2 |
Best plane from contour |
None |
304m3 |
|
11 |
00002 |
sand |
0/4 |
Best plane from contour |
None |
79m3 |
*: refer to the section Clean noisy points.
Clean noisy points
In some cases (for instance n°6), you may have to remove noisy points. Click Cancel to exit the command. Select the Main cloud and launch Clean / Separate to remove the points.
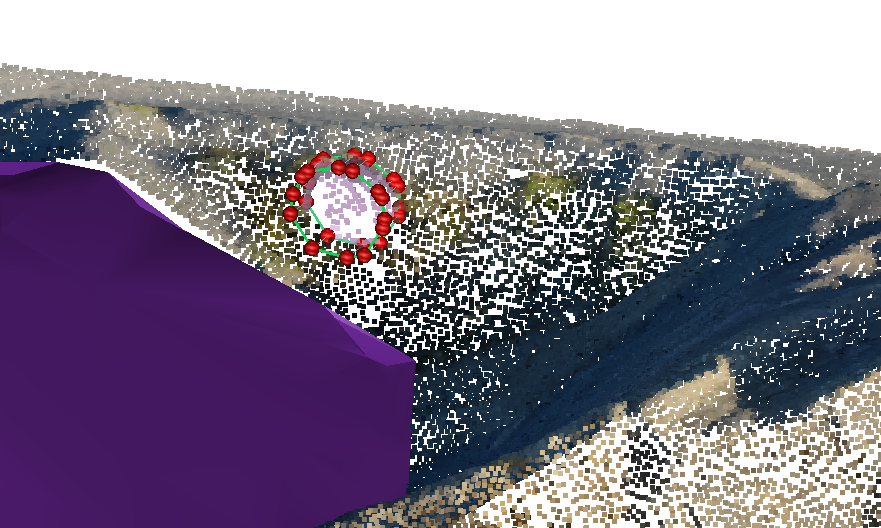 Figure 3: remove noisy points
Note
Noisy points must be removed before the stockpile computation. If the stockpile project has been created, you have to modify the Main cloud inside the project folder. Otherwise, you can simply modify the input cloud.
Add Labels
Finally, add labels for all stockpiles and define a single color for the stockpiles which have been divided into two parts. Choose a new color or copy/paste for instance the HTML color code.
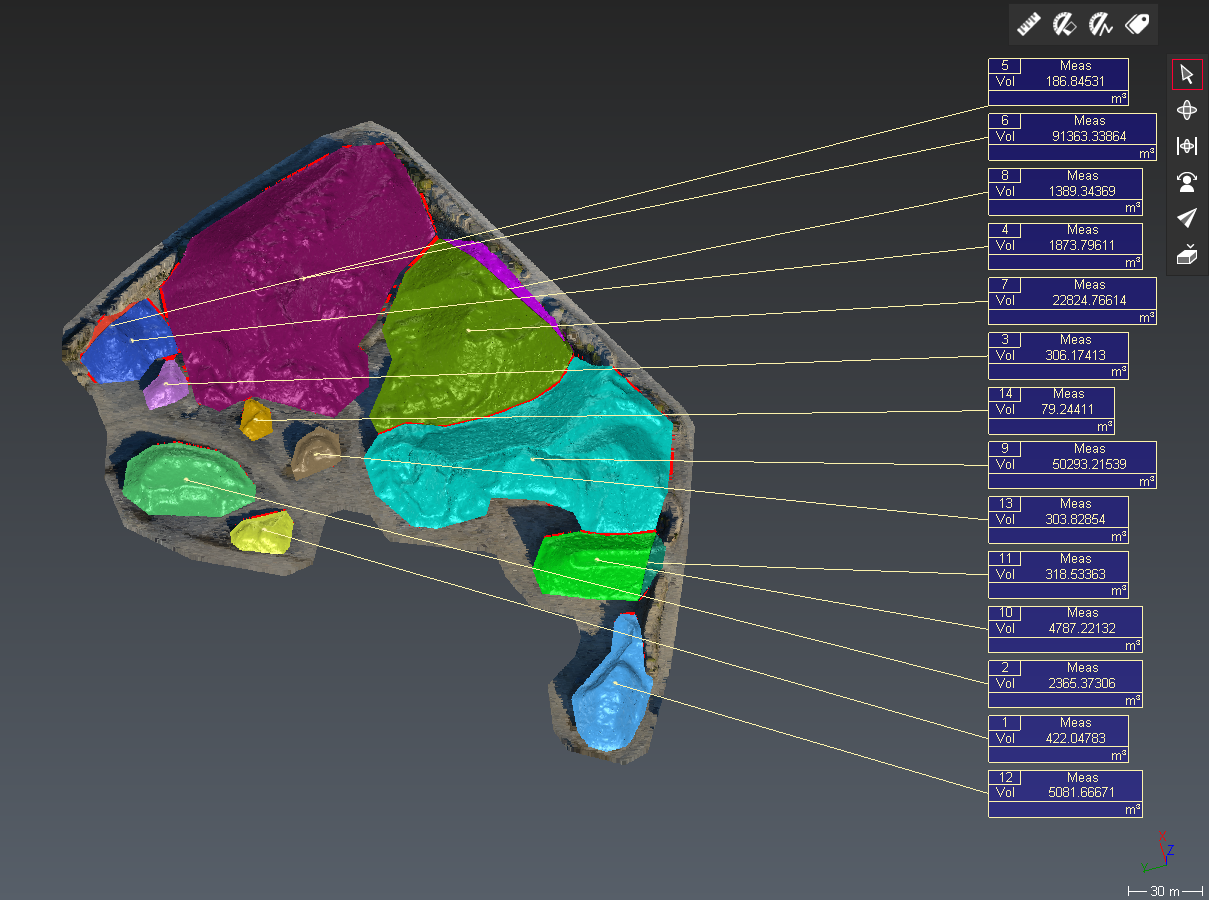 Figure 4: colored map with labels
Create a report
Launch Report Editor. Actually, you must see the default template for stockpile projects. At this step, you must have two chapters called Cover and Stockpile Project. You are going to customize the second chapter:
keep one item in header and footer. Drag and drop Project name from the group DATA to the header . Drag and drop Current page and Total page from the group DATA to the footer. Align these texts to the center with the tool bar,
remove the text item which is inside the body,
select the viewset and set the scale to 1:2500 in the group OPTIONS, select another size for labels (Minimum),
select the chart and filter the columns: show the numbers, the colors, the stockpile names, the material names, the material natures, the grain-sizes and the cut volumes,
align to center the table and reduce the number of decimals (click somewhere in the template view to display the LAYOUT panel), and
click To PDF to create your report.
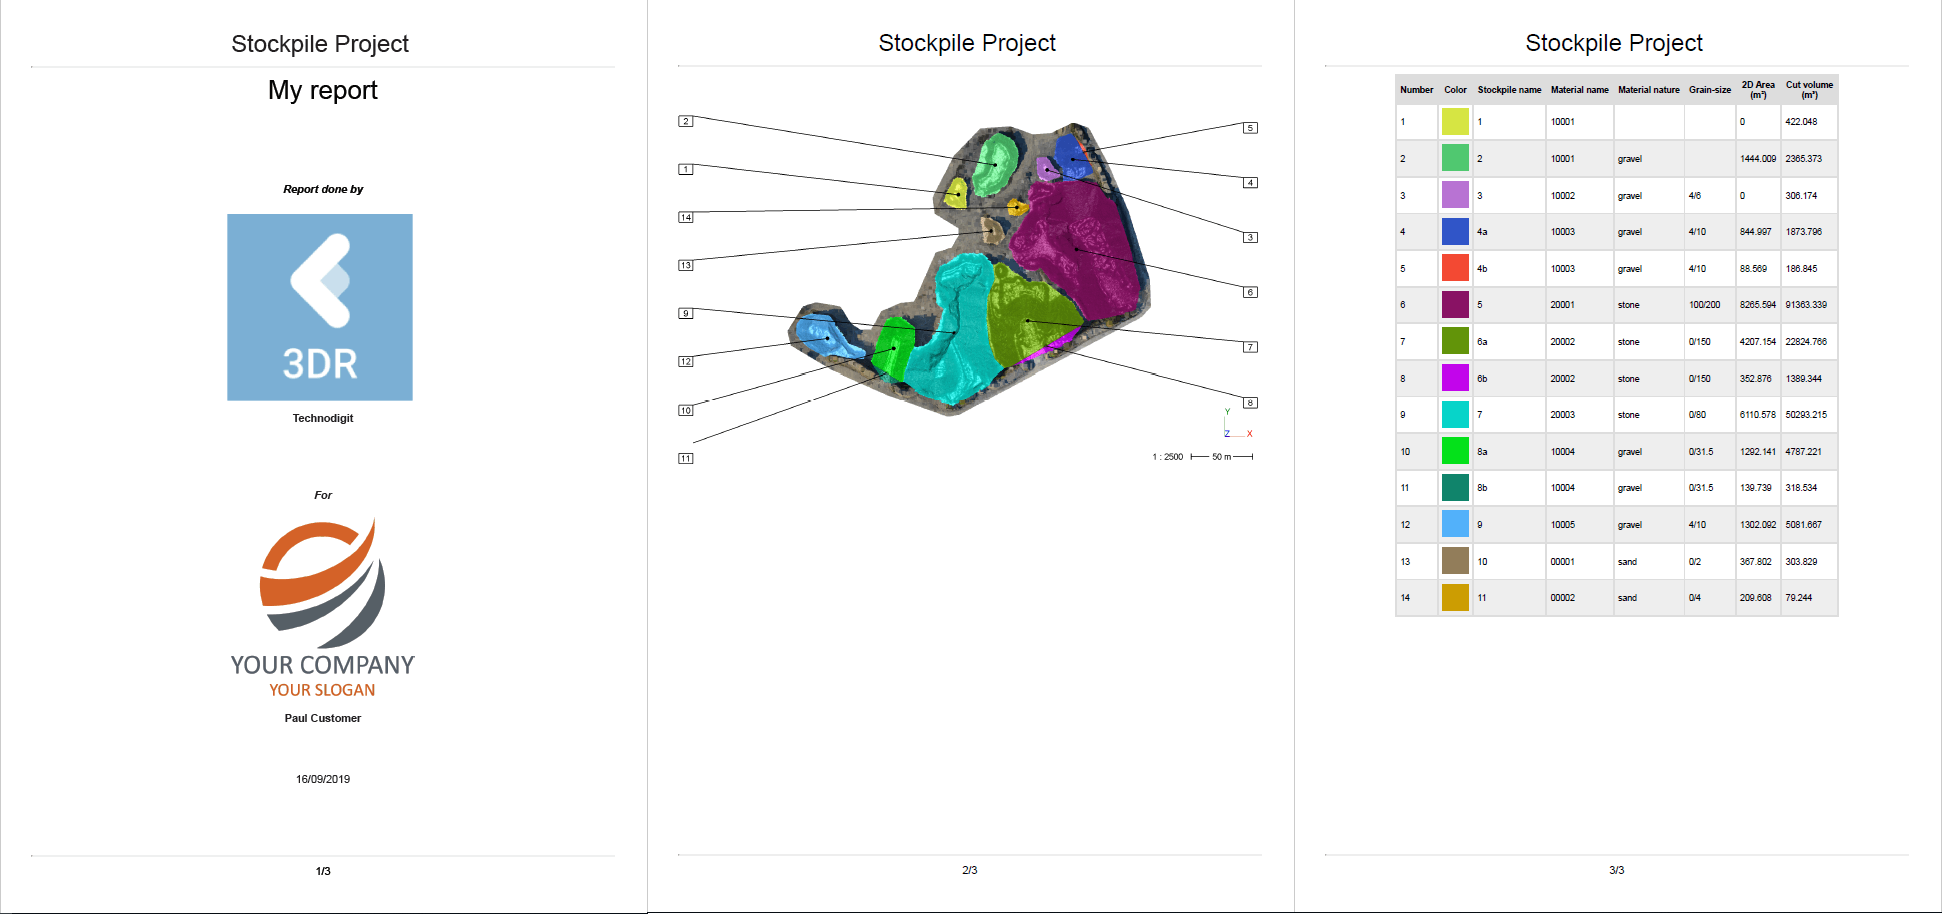 Fig. 5: report