Exercise: Merge meshes with different borders
Open the file MergeMeshes.3dr.
This file contains 3 meshes, and the goal of the exercise is to merge the meshes together.
With different borders and without overlapped area
Show only meshes Part 1 and Part 3. As you can see, there is a gap between the two meshes. In order to merge them, we need to build a junction. Go to Join 2 Contours.
Then click a point on each mesh border. Choose to continue with the entire contour. The result is not the expected one because the complete borders have been joined, but we want the junction to be only on the middle part.
Click the button Restrict, and then click on 2 points on the first contour to join in order to delimit the area. Then, click on a point on the wanted portion and press Enter. Do the same for the second contour.
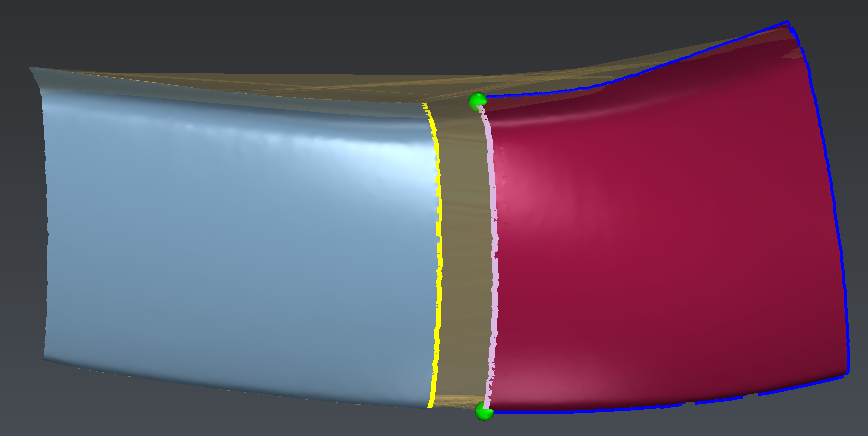 Define the portion to join
Then you can change tangency criteria. The best choice in this case is tangent to the surface. Select the option Triangle Reorganization in order to improve the result. Do not forget to select the option Sew in order to have only one mesh at the end.
Then click OK, Exit to validate. You can use the smoothing in order to improve the result on the sewing zone (see section Local smoothing in the Exercise: Improve global aspect and edges)
With different borders and overlapping area
Undo as necessary to retrieve the initial state of the file. Show only meshes Part 2 and Part 3. As you can see, there is an overlapping area between the two meshes. In order to merge the meshes, there are three possibilities:
Remove triangles to create a gap between the two meshes (use the command Clean / Separate Mesh), then apply the method described above with different borders and without overlapped area.
Remove triangles to make the two borders strictly identical. To do that, select one mesh and the polyline Section and go to Constraint Mesh. Uncheck 2D computation and check Cut in parts. Do the same with the second mesh. This command will cut the meshes along the polyline. Then, show only the 2 biggest parts, select the two biggest meshes and go to Merge Common Borders in order to create only one mesh.
Select both meshes and go to Stitch Meshes. Keep the default values and click Preview. The command will automatically stitch meshes according to the overlapping area (note that this command is not limited to 2 meshes).
Compound meshes
You can create only one object from different meshes, even if they do not have common borders. Select all the meshes you want to group and then go to Group Mesh. The associated command Ungroup Mesh will allow you to retrieve all the independent parts.
Note
This command is useful, for example, if you want to compute an inspection and your reference contains several independent parts. Because to compute the inspection you can select only two objects: the one corresponding to the reference and the one corresponding to the measure.