
This command deletes some triangles of mesh(es) or separates mesh(es) into several pieces. This command runs in 2 steps:
First, you select all the triangles you want to clean or separate.
Then, when you validate the command, the software recreates the topology of all the pieces.
In order to make the selection process easier, several methods are available. For each method, you have different parameters.
|

|
Choose a selection tool:
 to draw a freehand contour. Click and hold the left button pressed to draw the contour.
 to draw a polygon contour. Click every vertices. Undo the last vertex with DEL key. Close the contour with ENTER or C.
 to draw a rectangular contour. Click and hold the left button pressed to draw a window or click 3 points (first corner, direction and rectangle height).
 to draw a circular contour. Click the center and hold the left button pressed to enlarge the circle or click 3 points on it.
 to select triangle (works only for meshes). Click one triangle.
Choose whether you are going to add or remove points/triangles to the selection:
 to add to the selection.
 to remove from the selection.
Draw your contour. Note that rotation with the right mouse button is locked while you are drawing the contour.
Rotate the view and extrude your contour (works only for clouds): drag and drop a contour edge (or a red ball with the shift key pressed).
Modify the contour with the red balls. Drag and drop them to move the contour. Both basis are simultaneously modified. You can also select several balls with the CTRL key.
Click  to invert the selection.
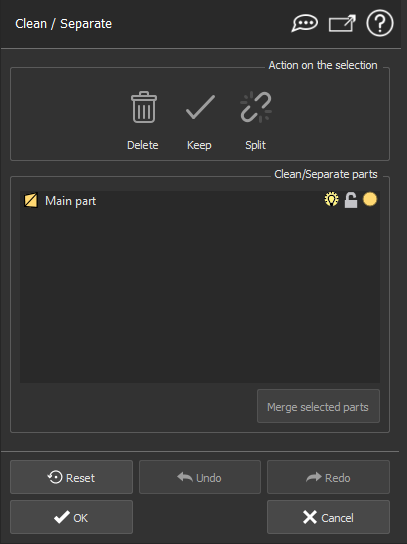
Apply an action to your selection:
 to delete the selection.
 to keep the selection. It is the same as deleting the reversed selection.
 to split the selection. This action will create a part with the selection and then you can follow your segmentation work with the remaining points.
Handle intermediary results, click:
 to hide or display the cloud.
 to lock or unlock the object. No selection occurs on a locked object.
 to change the object representation. Note that colors of new objects are set at random.
the Merge selected parts button to merge intermediary objects. You can also select several objects in Clean/Separate parts and make a right click.
You can change the name of objects (press F2, right click or slow double click)
Tip & Trick
Additional informations are displayed as tooltip over objects in the list.
Output options
Strictly inside: allows to control which triangle will be selected by a polygon considering the triangle location: inside, outside, crossing, etc.
If checked, select only the triangles whose 3 vertices are inside the polygon.
Otherwise, select only the triangles inside or having at least one edge crossing the polygon.
Visibility option:
Select Through: All triangles are selected: visible and hidden.
Only Visible: Select only the triangle(s) that you see.
Face: Select only the triangle(s) that you see on the face side (the most polished side).
Back: Select only the triangle(s) that you see on the back side (the dull side).
|
Tip & Trick
The Limit plane mode is available in this command so that at anytime you can press CTRL+Space shortcut to move the limit planes as you please.
Unlike Clean / Separate for cloud, when the representation of a piece is changed, it will affect all pieces inside the same input mesh. And only common representations to all input meshes are available.