Image management
Project
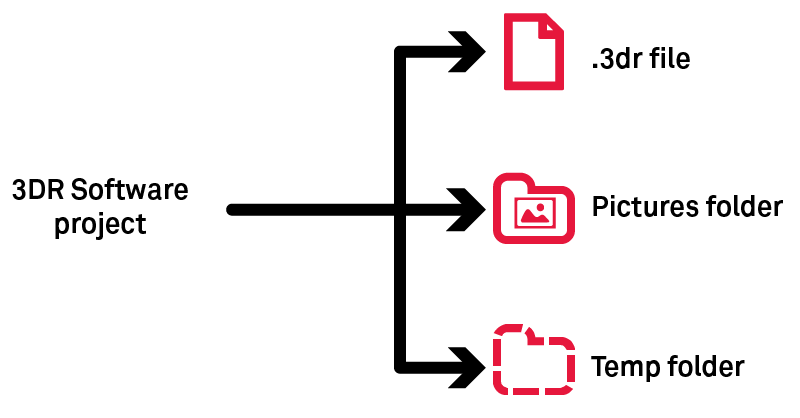
Pictures folder must follow the .3dr when you share your project.
Temp folder stores temporary images which are necessary while the project is open.
Image types
|
Type |
Comment |
|
Unknown/Abstract |
This is the default type when the type is unknown. Use Edit Image to set the image type. |
|
Perspective |
Type for pinhole images (usual photography from a camera). |
|
Ortho-image |
Similar to a raster map (contrary to perspective). You can create such images using Extract OrthoImage. |
|
Cubeface |
They are a set of 6 images on a cube (images share the same position). This object is not created by Cyclone 3DR, but are either imported as 6 independent images or as a spherical image. |
|
Spherical image |
Also called pano(ramic). This image is equivalent to a cubeface. |
Set of images
Perspective and spherical images can be stored either individually or grouped in a set of images.
In a set of images, images are also grouped by position. These positions are displayed in the scene like any scan position (Image Navigation Toolbar) and these positions are the access point to display images through the 3D scene.
Image display
|
|
Position display in the 3D scene |
Full display in the 3D scene |
Display in a 2D layout |
|
Spherical (individual or within an image set) |
Activate the display of positions (Image Navigation Toolbar). This display can be toggled object per object using the treeview. |
|
|
|
Perspective (individual or within an image set) |
|||
|
Ortho-image |
|
Use Go to camera viewpoint from the treeview. |
Use Image Preview from the ribbon or the treeview. |
|
Unknown |
|
|
Display from the camera viewpoint (image navigation or "go to camera viewpoint")
This display will use external and internal parameters. Consequently, you can use the image to draw objects.
How to import data?
Images stored on your local or remote drive: Import
Images stored in CloudWorx clouds (jsa, lgs): Convert Project (after opening the corresponding files)
Images stored in e57: Import
Images stored in a textured mesh: Extract Texture
Images stored in FIELD 360 jobs: Cyclone FIELD 360
The maximum number of pixels to import is 2^30, which is about 1 073 millions.
Refer to SImage, SSurveyingFormat and SCwCloud classes to import images through a script.
How to complete data (External and Internal parameters)?
|
|
Perspective |
Ortho-Image |
Spherical |
|
Internal and/or External |
External |
External |
|
|
Internal and/or External |
External |
External |
|
|
Internal |
- |
- |
|
|
Internal and/or External |
External |
External |
How to share georeferencing?
Ortho-Image: World files
This definition follows the ESRI standard (refer to word files).
Perspective: Excam and Incam files
These files are related to perspective images
|
External parameters, parameters which define the point of view:
|
Internal parameters, data collected from a camera calibration:
|
|
3DReshaper camera external parameters |
3DReshaper camera internal parameters |
How to texture?
You can texture and edit thanks to commands below:
Texturing masks
A mask is a black and white copy of the image saved in the same folder that can be displayed using Image Preview. Black areas correspond to ignored areas when texturing with the Smart Texture command; w hite areas will be used when texturing.
These masks are generated automatically while importing images or using Edit Mask.
Note that:
images imported in 2022.0 and previous versions haven't got masks.
the mask can be corrupted (wrong file path, mask image with another dimensions...).
How to export data?
|
Commands |
Formats |
|
|
|
|
Edit Image thanks to Save button |
excam + incam |
|
JPG, BMP, PNG, TIF + world files |
|
|
AutoCAD (through Extract OrthoImage) |
ortho-image |
|
Script (refer to SImage documentation) |
JPG, BMP, PNG, TIF + world files |