Axis Registration
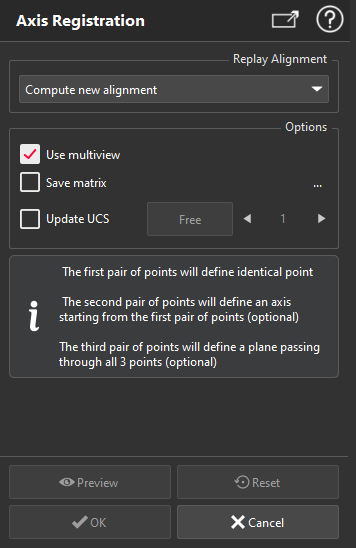
This command aligns the selected objects using 1, 2 or 3 pairs of points (called mobile and fixed points). This command will do:
point alignment giving 1 pair of points. This is equivalent to a translation from the first point to the second point.
linear alignment giving 2 pairs of points. This is equivalent to a translation + a rotation along an axis passing through the first point.
planar alignment giving 3 pairs of points. This is equivalent to a translation + 2 rotations. When three point couples are entered, this registration method is also called Point-Line-Plane method.
Considering the 3 pairs of points are clicked, the software calculates the transformation that successfully does the following operations:
Translation from the mobile point n°1 to the fixed point n°1 (exactly). Note that you can click twice the same point to bypass the translation step and perform pure rotation(s).
Rotation around point n°1 to have mobile point n°2 on the same line as fixed points n°1 and 2 (exactly).
Rotation around the axis defined by the fixed points n°1 and 2 to have the mobile point n°3 in the plane defined by fixed points n°1, 2 and 3 (exactly).
This command may solve two types of problems:
Making a coarse pre-positioning registration and then Best Fit Registration that is used to make the fine registration. In this case, the point couples (departure, arrival) are given roughly with a click on the shape because you do not need to be accurate.
To make a geometrical based alignment. In this case, you must give points as accurately as possible because this method will not be completed afterwards by another "fine registration" method. Here, you will click particular points on the measurement object such as center of holes, corners, intersection of 3 planes, etc. and the corresponding target point, line and plane on the reference object (often an imported CAD object) or with explicit coordinates. Most often, to get this particular reference point, you will need to previously make a geometrical construction with commands computing best shapes or extracting shapes (in menu Construct or Old_Measure, Intersection, Projection, etc.). Then you will use the different options of Define points to extract the endpoint, middle, intersection, vertex, etc. It is also possible to enter an explicit coordinate such as 451.32, -523.45, 56.678 inside the XYZ field of Define points.
The most common way to use this command is to align two coordinate systems O-X-Y-Z and O'-X'-Y'-Z'. In this case the goal is to align the axis.
Select the object(s) to move and launch the command.
|
|
Information about transformation: Once the transformation(s) has been computed, the command gives you information about the movement of all the selected objects. In an attached dialog box, you can see a detailed listing of transformations applied to the different objects inside the selection, which the combination of the 6 degrees of freedom:
Note The 3 rotations are also called "Euler angles". Here, the angles are assumed to be applied in order Z->Y->X such that R = Rx.Ry.Rz, which is the most common convention. In addition, the command finds the point of the model having the greatest movement and tells you this distance (which is greater than all other points of the model). Update coordinate system n°: When connected to a laser arm, this option allows to create or update the coordinate system the arm will use for the next measurements (commands Measure through RDS, Probe Feature). Select the coordinate system number with the the arrow (up and down). You can define up to 9 coordinate systems. If a matrix already exists for the selected coordinate system, you can either:
When OK is clicked the alignment movement is stored for further replay. Then, if you Preview or OK selecting the Replay last alignment option, the previous alignment will be applied to the selected objects. If you need to reverse the previous alignment you just need to select the Reverse alignment option. |
